Overview
Setting up your data source can be done in two ways - uploading your schema or setting it up manually within the interface.
Setting and editing your data source manually
Before you set up the entries (ie the columns), you need to define a new data source. To do that, you need log in to your Nibi account and go to the dashboard section.
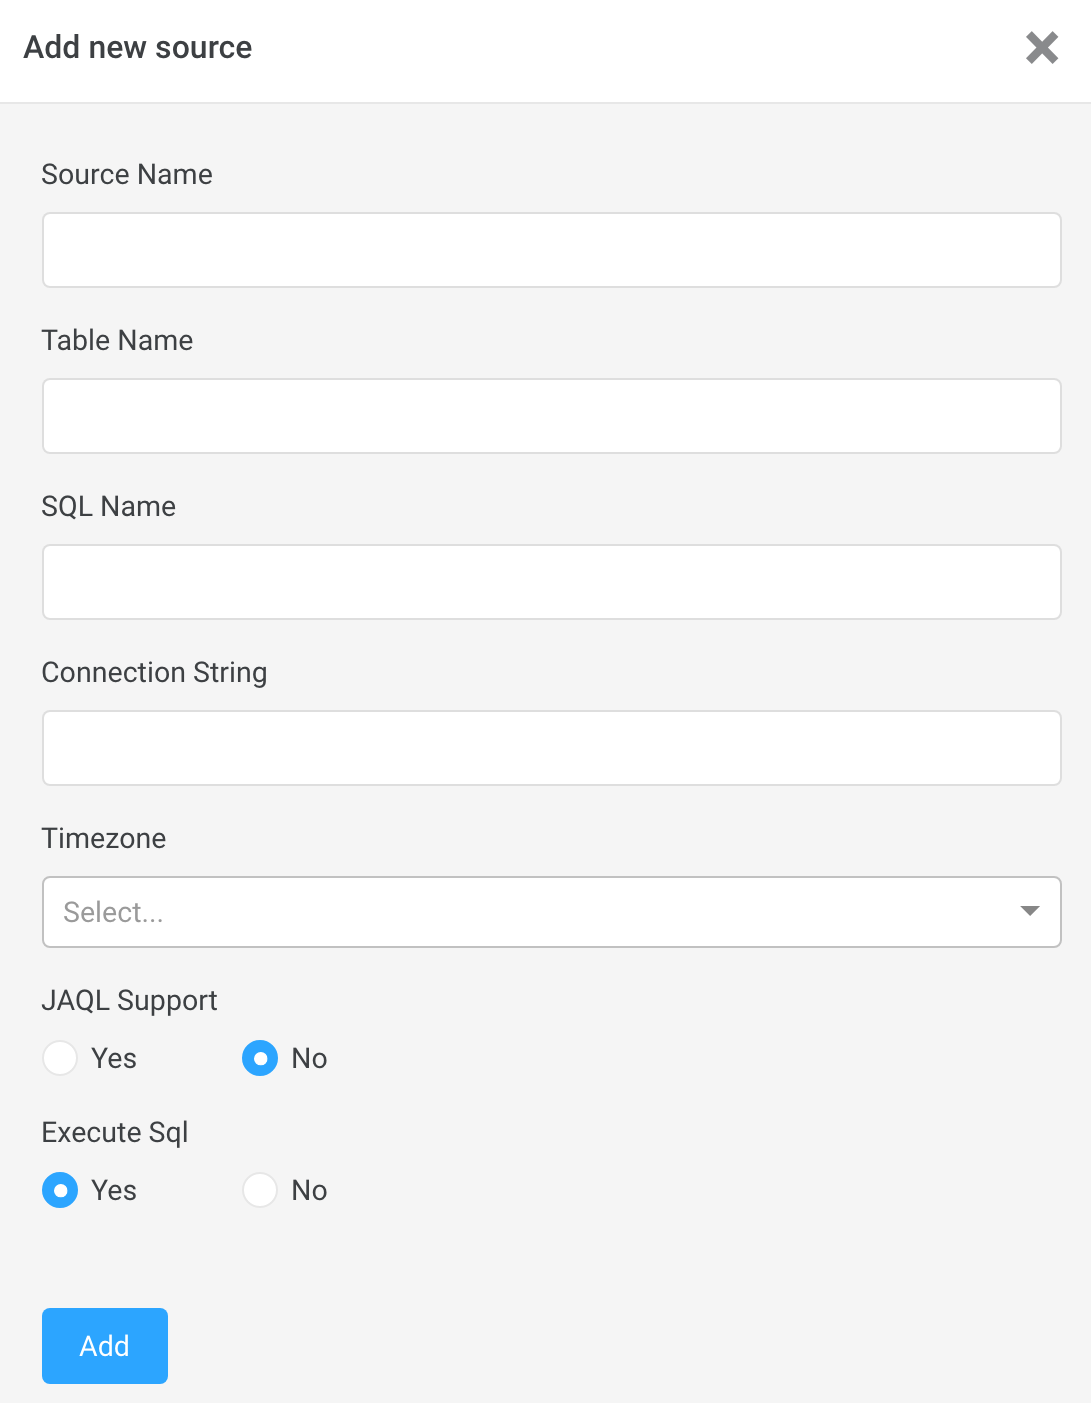
There, you click on add new source which will be followed by the window below.

Here you need to type in a few parameters:
| Name | Description |
|---|---|
| Sourcename | The internal name of the table - for example, “WeeklyUpdate” |
| Tablename | The display name of the database - for example, “Acquisition”. |
| SQLname | The name of the table as it is defined in your database. Please note that there are differences between databases and you should follow the instructions on how to set up a connection string here. |
| Connection String | see more information here |
| Time Zone | set up the time zone of the users |
| SQL Support | tick this one if you want to execute an SQL |
| JAQL Support | tick this one if you connect to Sisense |
Now that the data source is set up, you can move forward and add the fields. Click on the +Add button (see marked below) to add new columns to your data source.

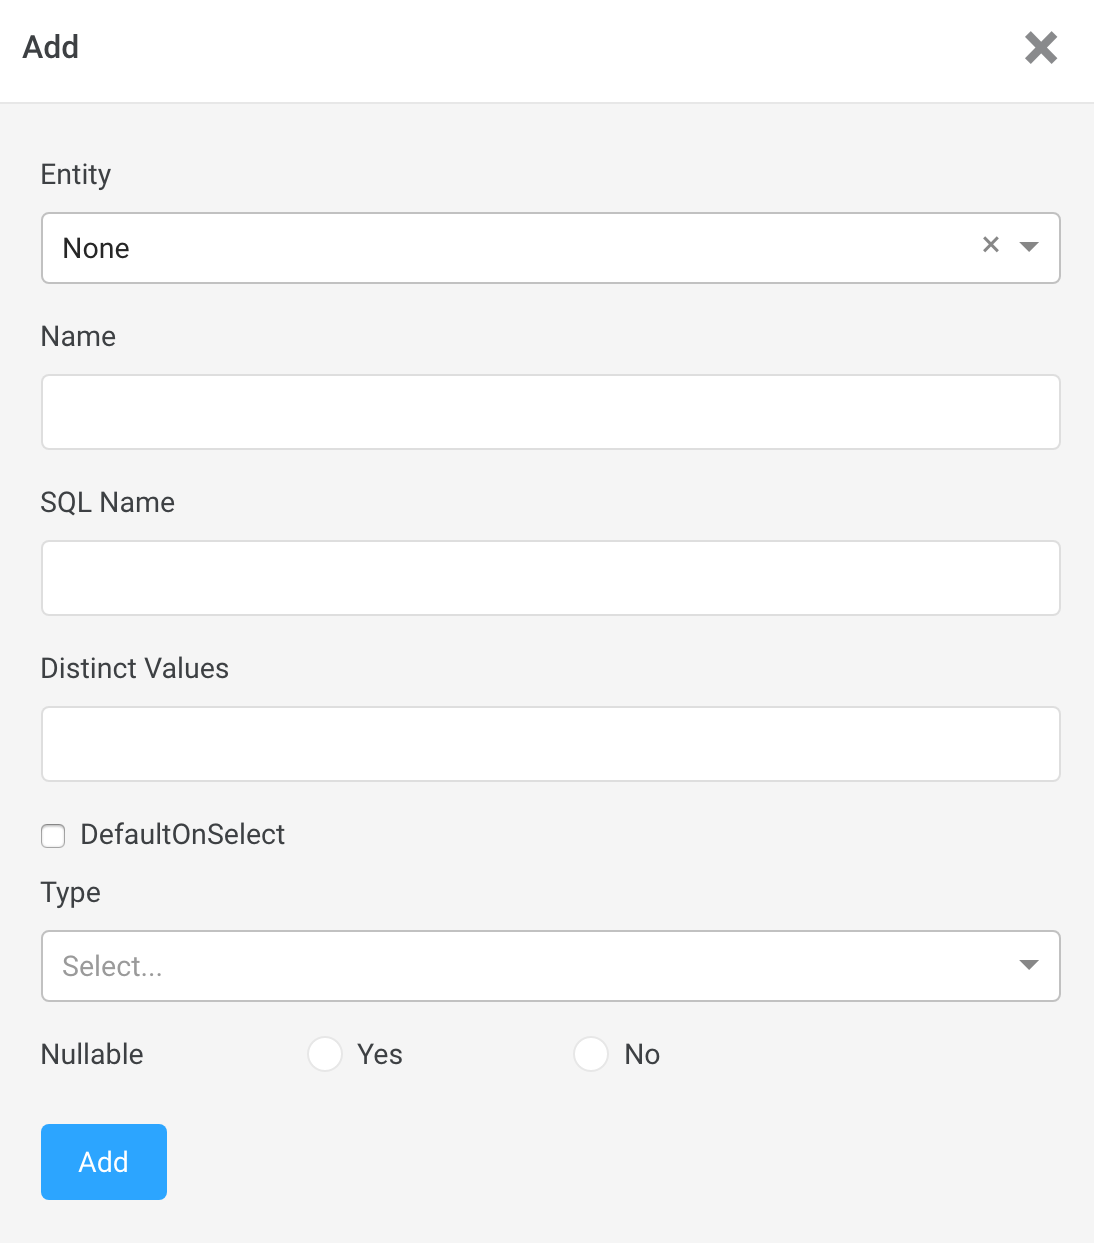
The following window will open:
 Now you need to config the fields/columns:
-
Entity (not mandatory) - you can use it to describe the type of data you store. Right now we support the ones below. Please note that if you pick a location entity (country, city or region), you don’t need to add distinct values as we already have a list of all the countries, cities and regions in the world. Once you set the entity, you can decide if you want this field to be the default of this type of entity - e.g. “Created date” as a default entity will win “Termination date” when the user doesn’t define a specific date column - for example, “Show me companies last year” will get answers of companies that founded last year and not companies that went out of business.
- Date
- Country
- City
- Region
-
Name (mandatory) - allows you to give the field a simple name that will most likely be used to address it - for example - first name, companies, created date, founded date and so forth. Please note that you can give aliases to each name to expend the language - for example - founded date, created data. You need to separate the words with a comma.
- SQL name (mandatory) - the name of the column as it’s written in your database
- Distinct values (not mandatory) - you can add distinct values to allow the user to ask specifically on them - for example, if you add the name Google to the list of companies, you will be able to ask “how much Google is valued” instead of “how much companies that equal Google is valued”
- DefaultOnSelect - you can decide which fields will be shown in the answer when there are no specific fields asked - for example, if you set the field country as default on select, and then ask “show me all companies” you will get the column country.
- Type - this field defines the type of column:
- Boolean - we recommend giving it a simple name such as “active” and set it as a distinct value so you can ask “show me active users”
- Number
- Date
- Text
- Datetime
- Timestamp
Setting and editing your data source via API or uploading a JSON
Another way to create a data source is via our API or uploading a JSON in the interface. Below is a sample JSON
{
  "sourceName": "Demo",
  "columns": [
    {
      "SqlName": "company",
      "Entity": "none",
      "defaultOnSelect": true,
      "distinctValues": [
        "Google",
        "Facebook"
      ],
      "name": "Company",
      "type": "text",
      "nullable": "",
      "id": "32381263",
      "defaultEntity": false
    },
    {
      "SqlName": "City",
      "Entity": "City",
      "defaultOnSelect": false,
      "distinctValues": [
        ""
      ],
      "name": "City",
      "type": "text",
      "nullable": "",
      "id": "32381263",
      "defaultEntity": true
    },
    {
      "SqlName": "Foundingdate",
      "Entity": "Date",
      "defaultOnSelect": false,
      "distinctValues": [
        ""
      ],
      "name": "Founding date",
      "type": "date",
      "nullable": "",
      "id": "32381263",
      "defaultEntity": true
    }
  ],
  "id": "13529329",
  "SqlName": "Demo",
  "tableName": "Company",
  "jaqlSupport": "no",
  "timezone": "",
  "executeSql": "yes",
  "connectionString": ""
}
Here is an explenation of the syntax:
- SourceName - The internal name of the table
- Columns
| Name | Description |
|---|---|
Entity (not mandatory) |
you can use it to describe the type of data you store. Right now we support the ones below. Please note that if you pick a location entity (country, city or region), you don’t need to add distinct values as we already have a list of all the countries, cities and regions in the world. Once you set the entity, you can decide if you want this field to be the default of this type of entity - e.g. “Created date” as a default entity will win “Termination date” when the user doesn’t define a specific date column - for example, “Show me companies last year” will get answers of companies that founded last year and not companies that went out of business. Date Country City Region |
Name (mandatory) |
allows you to give the field a simple name that will most likely be used to address it - for example - first name, companies, created date, founded date and so forth. Please note that you can give aliases to each name to expend the language - for example - founded date, created data. You need to separate the words with a comma. |
SQL name (mandatory) |
the name of the column as it’s written in your database |
Distinct values (not mandatory) |
you can add distinct values to allow the user to ask specifically on them - for example, if you add the name Google to the list of companies, you will be able to ask “how much Google is valued” instead of “how much companies that equal Google is valued” |
DefaultOnSelect |
you can decide which fields will be shown in the answer when there are no specific fields asked - for example, if you set the field country as default on select, and then ask “show me all companies” you will get the column country. |
Type |
this field defines the type of column: Boolean - we recommend giving it a simple name such as “active” and set it as a distinct value so you can ask “show me active users” , Number , Date, Text, timestamp, datetime |
Supported databases)
Allowing nibi.ai to access your database- if your database isnt open to the world, you will need to open 2 IPs in your database firewall : ip:35.227.67.122 and 35.227.106.55
Nibi is using Use SQLAlchamy syntax, in order to connect to your database.
Note: Even if you do NOT plan to execute the sql, it is important, that you will enter the connection string with dummy parameters in order for nibi.ai to generate the sql dialect of the specific database.
If you dont enter anything we generates postgress dialect .
-
Postgress:
postgresql://scott:tiger@localhost:5432/mydatabase -
Athena:
awsathena+rest://{aws_access_key_id}:{aws_secret_access_key}@athena.{region_name}.amazonaws.com:443/{schema_name}?s3_staging_dir={s3_staging_dir} -
Redshift:
redshift+psycopg2://username@host.amazonaws.com:5439/database -
MySql:
mysql+pymysql://scott:tiger@localhost/myisam_database -
Bigquery:
bigquery://project_name(for bugquery, please contact our customer success for authorization process. -
SQL Server:
- Sql server:
mssql+pyodbc://scott:tiger@myhost:port/databasename?driver=SQL+Server+Native+Client+10.0 - Sql server on azure:
mssql+pyodbc://user@sql_database:password@sql_server.database.windows.net/sql_database;
?driver=SQL+Server+Native+Client+10.0
- Sql server:
-
Google sheets:
gsheets://(in beta) read more